Ray Traced Shadows
 Configuring Lighting for RPCs Introduction
A designer’s use of lighting in a scene will determine the realism and believability of the finished product. This is the most difficult component when working with 3D design applications. ArchVision has worked to create RPCs that compliment a scene and can be manipulated to look good with nearly any lighting scenario. The following documentation will provide information that will help you to configure your RPCs to render attractively and predictably in your scenes.
Self-Illumination
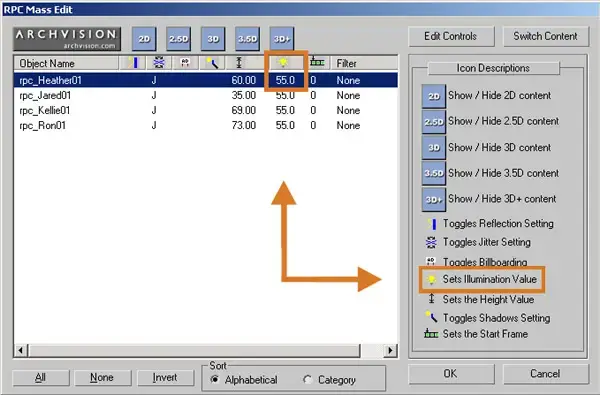
The process of creating RPCs provides the finished RPC object with inherent lighting included in the capture process. How much of this “built-in” lighting is seen versus the scene’s lighting can be changed using the self-illumination controls in the Mass Edit tool. An image of the Self-Illumination control and Mass Edit Tool are shown below.
RPCs will render partially lit even without any lighting because they have a default self-illumination value. This varies depending on the type of RPC Content. RPC People have a default value of 55, and RPC Trees have a default self-illumination value of 75. This value can be changed in the Mass Edit tool. The percentage of self-illumination determines how the RPC will interact with the scene’s lighting. A lower self-illumination value indicates that the RPC is more dependent on the scene’s lighting and relies less on the lighting captured with the RPC. A higher self-illumination value indicates that the RPC is less dependent on the scene’s lighting and relies more on the lighting captured with the RPC.
RPCs added to a scene with no lighting will tend to become dark at lower values and bright at higher values of self-illumination. However, this is not always the case due to the interaction with lighting in the scene. In a scene with too much light, lower levels of self-illumination will increase brightness. In a scene where there is not enough lighting the RPC may become darker when configured to have less self-illumination. At a self-illumination value of 100 percent, an RPC should be completely independent of the scenes lighting configuration.
Note: There is an exception to this rule. Earlier versions of VIZ, prior to VIZ 2005 may still be affected by the scene’s lighting even with a self-illumination value of 100 percent. Also, unrealistic lighting intensities may also elicit problems for RPCs even at 100 percent.
Non 3D+ RPC Object Properties
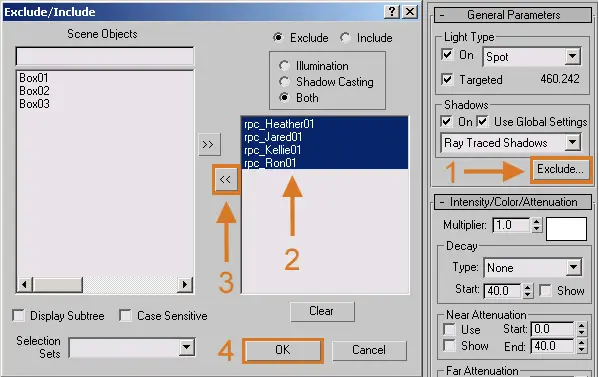
RPC Objects used in VIZ or MAX are excluded from the scenes lighting. Unlike Standard Primitives and other default MAX/VIZ objects, RPCs are not automatically added to a light’s include list. If you want the RPC Content to be affected by the scene’s lighting, it will be necessary to manually add the desired RPC(s) to the include list of the light.
To add RPCs to the light source Include list:
- 1.) With the light source selected, click the Exclude button from the General Parameters rollout on the Modify Panel.
- 2.) Highlight the RPC Content currently in the Exclude List.
- 3.) Select the arrow button to move the selected RPC Content to the Include list.
- 4.) Click OK to save changes
Radiosity Note: RPCs are excluded from radiosity calculations by default. This is necessary because an RPC is not a static piece of geometry, and non-static geometry causes radiosity calculations to be incorrect. Because of the unpredictable, and almost always undesirable results, we recommend the RPCs remain excluded from Radiosity calculations.
Troubleshooting 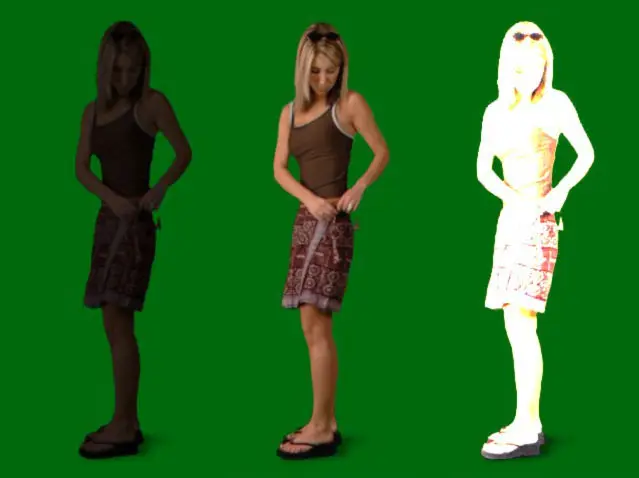
Dark RPCs
The left image of Heather above is very dark. Try the following to brighten the image:
- 1.) Increase the intensity of the light: A brighter light will increase the brightness of an RPC if it is included in the light source.
- 2.) Increase the self-illumination value of the light source: This will provide more of the built-in lighting of the RPC object.
- 3.) Change the self-illumination to 100: At a self-illumination value of 100 the RPC object is completely independent of the scene’s lighting.
Burnt Out RPCs
The right image of Heather above is overexposed. Try the following to reduce the brightness:
- 1.) Decrease the intensity of the light: A dimmer light will decrease the brightness of an RPC if it is included in the light source.
- 2.) Decrease the self-illumination value of the light source: This will provide less of the built-in lighting of the RPC object.
- 3.) Change the self-illumination to 100: At a self-illumination value of 100 the RPC object is completely independent of the scene’s lighting.
Configuring Exposure Controls
The following information about Exposure Controls has been reprinted from the 3dstudio Max 6 Help Document created by Autodesk. Max users can access this document on the Autodesk 3D Studio MAX 6 CD.
Logarithmic Exposure
Logarithmic Exposure Control uses brightness, contrast, and whether the scene is outdoors in daylight to map physical values to RGB values. Logarithmic Exposure Control is better for scenes with a very high dynamic range.
The intensity of an IES sun light completely overexposes a scene.
Logarithmic exposure control corrects the overexposure.
Note: Logarithmic Exposure Control is the best type of exposure control for animations because it doesn’t use histograms.
Linear Exposure
Linear Exposure Control samples the rendered image and uses the average brightness of the scene to map physical values to RGB values. Linear Exposure Control is best used for scenes with a fairly low dynamic range.
Note: Linear Exposure Control should not be used in animations, because every frame will have a different histogram, causing your animation to flicker.
Automatic Exposure
Automatic Exposure Control samples the rendered image and builds a histogram to give good color separation across the entire dynamic range of the rendering. It can enhance some lighting effects that would otherwise be too dim to see.
Note: Automatic Exposure Control should not be used in animations, because every frame will have a different histogram, causing your animation to flicker.
Source: “3ds Max 6 User Reference” 3dsmax.chm. Autodesk 3D Studio MAX 6 CD. United States: Autodesk, 2003.
Exposure Control Example
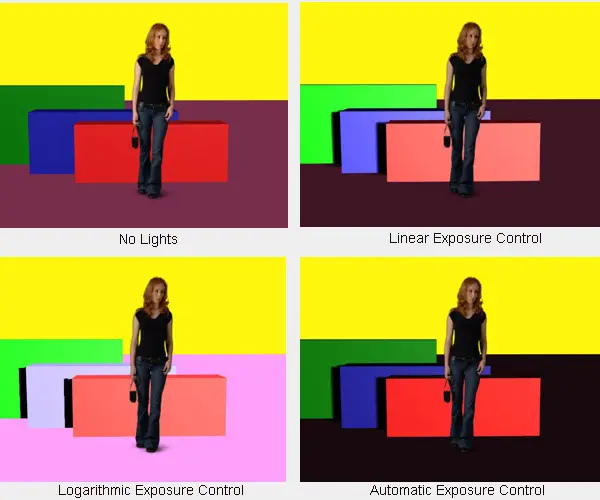
The following renderings depict the effects of Exposure Controls on RPCs and other objects. The image labeled No Lights shows a rendering with no lights and no Exposure Control applied. The image labeled Linear Exposure shows a rendering with a Daylight System (IES Sun) with 90,000 lx brightness, and the Physical Scale is set to 90,000, the RPC’s self illumination has been boosted to 75 to accommodate this lighting scenario. The image labeled Logarithmic Exposure is configured the same as the example used for Linear Exposure. The image labeled Automatic Exposure is also configured the same. Notice the differences when rendered.
Note: The option to process backgrounds was not applied in these examples. This would have caused the yellow background to change in each example.
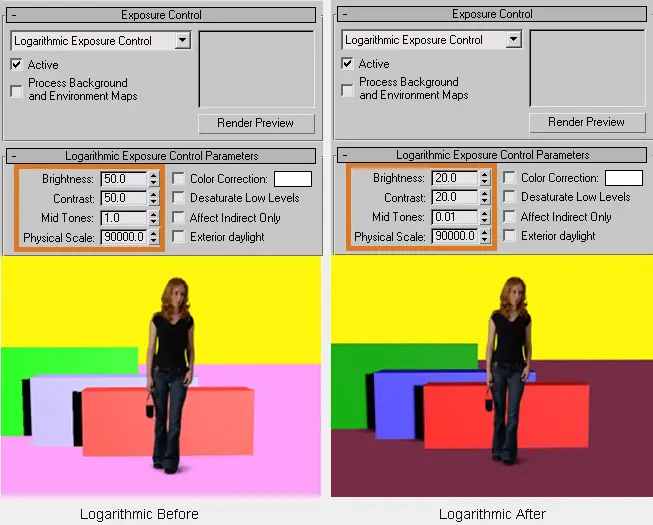
Similar results can be achieved regardless of the type of exposure control by changing other variables in the scene. The following image is the Logarithmic Example mentioned above with modifications made to the brightness, contrast and mid tones controls. The brightness and contrast controls were changed from the default values to 20 and the mid tones value was changed from 1 to .01. Notice the differences in the example below. Now the Logarithmic Exposure rendering looks more like the rendering before lighting was added.
 Exposure Control Issues in VIZ Applications
Overexposed RPCs (Caused by Exposure Controls in VIZ)
The exposure control feature in some versions of VIZ do not behave correctly with self-illuminated objects. Because of this users who are using the exposure control feature (or Daylights which automatically use exposure control), will see RPCs as being blown out (over-exposed). There are two ways to correct this condition. The first is to change the Exposure control settings. This can be done on the Environment control panel (Rendering menu, Environment selection). Change the brightness of the Logarithmic Exposure Controls to be between 55 and 60. The second method is to reduce the self-illumination of the RPCs. This can be accomplished on the RPC Utilities panel (select an RPC the RPC Utilities button will be the first button in the Modify panel). Select all of the RPCs and click in the column under the light bulb. Change the self-illumination setting to between 30 and 40.
Dark RPCs (Caused by Exposure Controls in VIZ)
There is another problem rendering RPCs with the exposure control feature (or Daylights which automatically use exposure control). This problem is a result of the Physical Scale and the Intensity being out of range. This problem results in RPCs that appear to be a solid black silhouette.
The way to correct this problem is to bring the Physical Scale of the exposure control and the Intensity of the light back into correlation. If using Automatic or Linear exposure control then set the Physical Scale to around the same value as the Intensity of the light. For example if the light has an Intensity of 90000 lx then the Physical Scale for the exposure control should be about 90000.
These suggestions should help you to achieve excellent results using RPC, Physical Scale and Exposure Control (Daylights).
Need help? Please e-mail support@archvision.com.